
The most important thing to know before you start: pressure washing is not the same as roof cleaning, and for asphalt shingles — which cover roughly 80% of American homes — it is genuinely the wrong method. The Asphalt Roofing Manufacturers Association (ARMA) endorses soft washing as the correct cleaning method for shingles, not high-pressure washing, and for good reason. Done incorrectly, a single pressure washing session can strip the granules that protect your shingles from UV damage and void your manufacturer warranty in an afternoon.
That said, pressure washing is the right approach for concrete tile and metal roofs. This guide covers both — the correct method for each roof type, with the PSI settings, nozzle choices and technique that actually work without causing damage.
Before you start: understand your roof type
The correct cleaning method is determined entirely by your roofing material. Using the wrong method on the wrong material causes damage that may not show up for months — reduced shingle life, failed flashings, or water infiltration you cannot trace back to the cleaning event.
| Roof type | Recommended method | Maximum PSI | Notes |
|---|---|---|---|
| Asphalt shingle | Soft wash only | 50 – 150 PSI | High pressure strips granules and voids warranties |
| Architectural / dimensional shingle | Soft wash only | 50 – 150 PSI | Same risk as standard asphalt |
| Concrete tile | Pressure wash (low-medium) | 1,200 – 2,000 PSI | Always wash ridge to eave, never upward |
| Clay tile | Pressure wash (low-medium) | 1,200 – 1,800 PSI | More brittle than concrete — do not walk on tiles |
| Metal (steel / aluminium) | Pressure wash | 1,200 – 1,500 PSI | Reduce to 800–1,000 PSI for copper or painted finishes |
| Cedar shake | Soft wash only | Under 500 PSI | High pressure splits fibres |
| Slate | Soft wash only | Under 500 PSI | Slate fractures under mechanical pressure |
If your roof is asphalt shingle, skip directly to the soft wash section below. The step-by-step pressure washing guide in the sections after that applies to tile and metal roofs.
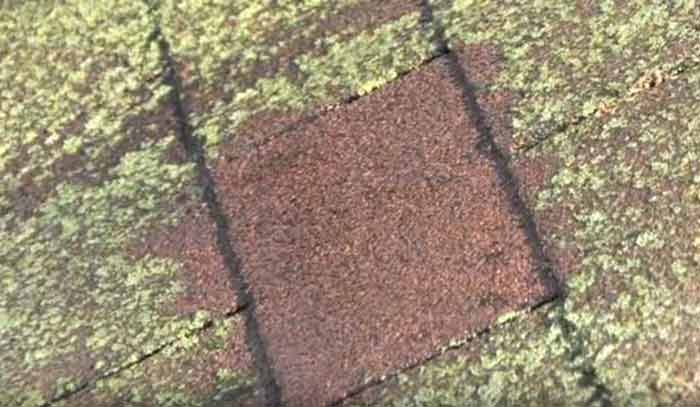
What you are actually cleaning — and why method matters
The dark streaking and green patches on most roofs are not dirt. The black streaks are caused by Gloeocapsa magma, a cyanobacterium that feeds on the calcium carbonate limestone filler in asphalt shingles. Moss, algae and lichen are living organisms with root systems that penetrate shingle surfaces.
This matters because it determines which cleaning approach works:
Pressure washing removes the visible growth but leaves spores and root structures behind. Expect regrowth within 6–18 months on an asphalt shingle roof cleaned with high pressure alone.
Soft washing uses sodium hypochlorite chemistry to kill organisms at the cellular level. The low-pressure rinse removes dead matter rather than mechanically blasting it off. Results from a proper soft wash last 2–5 years.
For tile and metal roofs, pressure washing is appropriate because those materials can withstand the mechanical force and the biology is less capable of penetrating hard surfaces. For asphalt shingles, soft washing is not just safer — it delivers better results that last longer.
Equipment you need
For soft washing (asphalt shingles, cedar shake, slate)
- Soft wash system or pressure washer capable of operating at 50–150 PSI with a low-pressure tip (often marked with a black cap)
- Sodium hypochlorite solution — pool-grade bleach diluted to 3–6% concentration
- Surfactant / roof cleaning solution to help the chemical dwell on the surface
- Garden hose for pre-wetting and final rinse
- Pump sprayer as an alternative to a soft wash system for small roofs
- Non-slip rubber-soled shoes
- Safety harness rated for roof work — non-negotiable above single storey
- Safety goggles and chemical-resistant gloves
- Plastic sheeting or wet-down coverage for landscaping below the roofline
For pressure washing (tile and metal)
- Pressure washer capable of 1,200–2,000 PSI with adjustable settings
- 25-degree nozzle (green) for general tile and metal cleaning
- 40-degree nozzle (white) for wider coverage and gentler application on older or more delicate surfaces
- Avoid 0-degree (red) and 15-degree (yellow) nozzles on any roofing material — too concentrated
- Telescoping wand if cleaning from the ground or from a ladder (reduces need to stand on wet roof)
- Non-slip footwear
- Safety harness for two-storey or steeper roof work
- Safety glasses
Soft washing asphalt shingles — step by step
Step 1 — Inspect before you touch anything
Walk the roof perimeter from the ground and look for: cracked or curling shingles, missing sections, sagging areas, granule loss in gutters (check during the inspection — heavy granule accumulation means the shingles are already compromised), and damaged flashings at the chimney, skylights and pipe boots. Do not proceed with any cleaning if the roof has active damage. Clean a structurally failing roof and you may introduce moisture through cracks the cleaning reveals. Address repairs first.
New shingles under 10 years old in good condition can tolerate low-pressure rinsing up to 1,200 PSI with a wide 40-degree nozzle. Mid-age shingles (10–20 years) should stay under 800 PSI. Anything older than 20 years — soft wash only, no mechanical pressure at all.
Step 2 — Protect plants and landscaping
The sodium hypochlorite solution used in soft washing is effective at killing biological growth on roofs. It is equally effective at burning plants, damaging paint and discolouring timber. Before applying any cleaning solution, wet down all plants, shrubs and garden beds immediately below the roofline with a garden hose. Wet the soil thoroughly so it cannot absorb the runoff. For anything valuable, lay plastic sheeting over the beds rather than relying on pre-wetting alone. After cleaning, re-rinse all plant areas with clean water immediately.
Step 3 — Mix your cleaning solution
A standard soft wash solution for roof cleaning is: 1 part sodium hypochlorite (pool-grade bleach at 10–12% concentration) to 2–3 parts water, with a small amount of surfactant to help the solution stick to the roof surface and extend its dwell time. This produces a 3–6% active chlorine solution at application.
Do not use straight bleach at full concentration — it increases risk of runoff damage to landscaping and provides no cleaning advantage over properly diluted solution. Do not mix bleach with any other cleaning chemical, including ammonia-based products. Never mix bleach and ammonia.
Step 4 — Apply the cleaning solution
Working from a ladder or from the roof using a soft wash system, apply the solution from the bottom of the roof upward so runoff does not flow over untreated sections before dwell time is reached. Apply evenly across the entire affected area, ensuring full coverage on dark-streaked sections, moss patches and shaded areas where growth concentrates.
Allow the solution to dwell for 15–30 minutes. You will see the biological growth visually change colour — algae and moss begin turning pale or brown as the chemistry kills the organisms at root level. Do not allow the solution to dry on the surface before rinsing.
Step 5 — Rinse
Using your soft wash system at 50–150 PSI, rinse from the ridge downward toward the eaves. The low pressure dislodges dead matter without stripping granules. A standard garden hose with a pressure nozzle is sufficient for rinsing if a soft wash system is not available — the rinsing itself does not need pressure beyond what gravity and a flowing hose delivers.
For heavier moss that has not fully released after the chemical treatment, a second application of solution followed by a second dwell period is safer than increasing rinse pressure. Never increase pressure to compensate for insufficient chemical dwell time.
Step 6 — Post-rinse plant check
Immediately after rinsing the roof, re-wet all plants and soil beds that received runoff. Check for any foliage that shows signs of chemical contact (yellowing, wilting) in the 24 hours following cleaning.
Pressure washing roof tiles — step by step
Concrete and clay tiles can withstand moderate pressure washing. The critical safety rule is directional: always spray downward from ridge to eave, never upward. Angling the nozzle upward under tile edges forces water beneath the tile — exactly the failure mode that causes tile roof leaks.
Step 1 — Pre-rinse to remove loose debris
Before applying full cleaning pressure, rinse the entire roof surface with a garden hose or low-pressure spray to clear loose organic debris. Dry leaf material and pine needles washed off at low pressure reduces the volume of wet debris during the main clean and makes the result more consistent.
Step 2 — Set up equipment
Attach a 25-degree (green) nozzle to your pressure washer for general tile cleaning. Start at 1,200 PSI — lower than the material’s maximum tolerance — and increase only if needed for stubborn growth. The correct approach is conservative pressure that produces clean results rather than maximum pressure that removes everything in one pass but risks tile cracking, grout damage or surface erosion on older tiles.
For clay tiles, which are more brittle than concrete, start at 1,000 PSI and use the 40-degree nozzle for greater coverage with less impact force per square inch.
Step 3 — Position yourself safely
Do not walk directly on tiles. Use a crawl board or roof ladder that distributes your weight across multiple tiles simultaneously. If you must step on the tile surface, step at the overlap points — the thickest section of each tile — rather than on the unsupported centre of each piece.
Position your ladder so it does not rest against tile surfaces. A ladder standoff bracket holds the ladder away from the roof surface — essential equipment for tile work.
Have a second person at the base of the ladder at all times.
Step 4 — Clean from ridge to eave in horizontal passes
Starting at the ridge, work across the roof in horizontal passes moving downward toward the eave. This ensures dirty water runs over uncleaned tile ahead of you rather than back over sections you have cleaned.
Keep the nozzle 12–18 inches from the tile surface and maintain a consistent distance and angle throughout each pass. Varying the distance varies the effective pressure on the surface — inconsistent cleaning results and the risk of localised over-pressurisation follow.
Never angle the nozzle upward to clean underneath tile edges. Any debris beneath tiles that cannot be dislodged by downward pressure should be addressed by hand after cleaning, not by directing water into the tile overlap from below.
Step 5 — Apply detergent for algae and moss if needed
For significant biological growth on tile roofs, apply a diluted sodium hypochlorite solution using a soft wash nozzle or low-pressure sprayer before the main pressure clean. Allow 10–15 minutes dwell time, then pressure wash as normal. The chemical pre-treatment loosens the biological adhesion, reducing the pressure needed and the number of passes required.
Do not inject detergent directly into the pressure washer unless it is a detergent-injection system rated for that use. Apply cleaning solutions separately, let them dwell, then rinse with the pressure washer.
Pressure washing metal roofs — step by step
Metal roofs are the most tolerant of pressure washing. Metal roofing handles 1,200 to 1,500 PSI comfortably. Use a wide fan nozzle, avoid direct pressure at seams and fastener points, and reduce to 800 to 1,000 PSI if you’re working on copper or painted finishes you want to preserve.
Step 1 — Apply detergent before pressure washing
Unlike tile roofs where detergent is optional for light cleaning, metal roofs benefit from pre-treatment in most cases. Apply a mild, pH-neutral detergent or purpose-formulated metal roof cleaner to the full surface before pressure washing. Allow 5–10 minutes dwell time. The detergent dissolves oxidation, surface rust staining, and organic deposits more effectively than mechanical pressure alone, and reduces the pressure needed for a clean result.
Do not use bleach-heavy solutions on unpainted metal — sodium hypochlorite can accelerate surface oxidation on uncoated steel. Use sodium hypochlorite solutions only on painted metal where the coating is intact and in good condition.
Step 2 — Set pressure and nozzle
Use a 25-degree (green) or 40-degree (white) nozzle. Start at 1,200 PSI. The wider 40-degree nozzle is preferable for standing seam metal roofs to avoid concentrating pressure at individual seam joints.
Never use a 0-degree or 15-degree nozzle on metal — concentrated pressure at close range can dent thin-gauge aluminium panels and damage protective coatings.
Step 3 — Rinse detergent from the top down
Working from the ridge toward the eave, rinse the detergent and dissolved debris off the roof in long horizontal sweeping passes. Maintain a consistent 12–18 inch distance from the surface.
Pay attention to panel seams — do not direct pressure into seam overlaps from the side. Spray along the direction of seams (ridge to eave) rather than perpendicular to them. The same logic applies to exposed fasteners: spray past them with the nozzle angle directed slightly away from the fastener head rather than directly at it, to avoid driving water behind the fastener seal.
Step 4 — Rinse walkways and reinforced sections
Metal roofs with walk pads or reinforced walkway sections can be cleaned with slightly higher pressure on those areas — the additional reinforcement tolerates higher impact force. Keep standard panel pressure at 1,200–1,500 PSI and walkway sections at up to 2,000 PSI if needed for stubborn soiling.
Safety rules that apply to all roof types
Work only in dry conditions. Never clean a roof when rain is forecast within 2 hours, when conditions are windy, or when the roof surface is already wet. A wet roof surface is dramatically more slippery than a dry one, regardless of shoe type.
Wear a safety harness. A fall from a single-storey roof is survivable. A fall from a two-storey or steeper roof is frequently not. Harness systems rated for roof work attach to a ridge anchor — a simple piece of hardware that takes 10 minutes to install and can be removed without damage after cleaning.
Never clean alone. Have someone at the base of the ladder at all times — both to stabilise it and to call for help if you do fall.
Wear appropriate footwear. Rubber-soled shoes with pronounced tread provide the best grip on dry roofing surfaces. Smooth-soled shoes are a fall waiting to happen on any roof type. On wet tiles specifically, no shoe provides reliable grip — minimise roof walking time and use a crawl board wherever possible.
Keep the pressure washer wand pointed away from yourself and others. A pressure washer operating at 1,500 PSI can cause serious laceration injuries at close range. Never aim it at another person, never step over the high-pressure hose while the machine is running, and shut the machine off before changing nozzles.
When to hire a professional instead
Consider hiring a professional for any of the following situations:
Two-storey or steeper roof. The fall risk increases non-linearly with height. The cost of a professional clean is a fraction of the cost of a hospitalisation.
Tile roof of any age. Walking on tiles without experience and a crawl board results in cracked tiles on most first attempts. A professional who works on tile roofs weekly knows exactly where to step and how to distribute their weight.
Significant moss or lichen growth. Lichen bonds to roofing materials and cannot be safely removed by mechanical pressure alone. It requires specialist chemical treatment followed by a return visit weeks later after the organism has fully died. This is difficult to manage as a DIY project.
Asphalt shingles over 15 years old. Granule adhesion on ageing shingles is compromised enough that even soft wash rinse pressure can cause measurable granule loss if technique is not precise. A professional with a proper soft wash system and experience assessing shingle condition makes better decisions in real time than a guide can anticipate.
You are unsure. The cost of getting this wrong — stripped shingles, forced water infiltration, voided warranty — substantially exceeds the cost of a professional clean. If you have any doubt about whether your technique or equipment is appropriate, hire someone.
Use our DIY vs Pro quiz for a clear recommendation based on your specific home’s height, roof type and condition.
How often should you clean your roof?
Most roofs need cleaning every 1–3 years depending on climate, tree coverage and roofing material. Humid climates (Southeast, Pacific Northwest) support faster biological growth and typically warrant annual cleaning. Dry climates (Southwest) may only need cleaning every 2–3 years. Homes under heavy tree canopy need more frequent attention.
Use our cleaning schedule generator for a personalised recommendation based on your specific roof type, location and coverage.
Frequently asked questions
Not with standard pressure washing settings. Asphalt shingles require soft washing at 50–150 PSI using a sodium hypochlorite solution. High-pressure washing strips the protective granule coating from shingles, accelerates UV deterioration, and voids most manufacturer warranties. The ARMA (Asphalt Roofing Manufacturers Association) explicitly endorses soft washing as the only approved cleaning method for asphalt shingles.
PSI depends entirely on roof type. Soft washing for asphalt shingles: 50–150 PSI. Concrete tile: 1,200–2,000 PSI. Clay tile: 1,000–1,800 PSI. Metal roofs: 1,200–1,500 PSI (reduce to 800–1,000 for copper or painted finishes). Never use above 1,500 PSI on any shingle surface regardless of age.
Pressure washing uses mechanical force — typically 1,000–4,000 PSI — to physically remove surface deposits. Soft washing uses low pressure (50–150 PSI) combined with a sodium hypochlorite cleaning solution that kills biological organisms at the cellular level. For asphalt shingles, soft washing produces results that last 2–5 years because it eliminates the organisms rather than removing their visible surface growth while leaving spores and root structures behind. Pressure washing on shingles typically produces regrowth within 6–18 months.
Yes. Most asphalt shingle manufacturers’ warranties specifically prohibit pressure washing. CertainTeed, GAF, Owens Corning, and other major manufacturers all recommend soft washing using ARMA-approved methods. If a contractor pressure washes your shingles and damage results, you have no warranty recourse. Always confirm your contractor’s cleaning method before authorising any work.
For concrete and clay tiles, use a diluted sodium hypochlorite solution (3–5%) or a purpose-formulated tile roof cleaner. Apply before pressure washing, allow 10–15 minutes dwell time, then rinse. Do not inject detergent directly into the pressure washer unless the machine is rated for that use. For metal roofs, use a pH-neutral or mildly alkaline detergent rather than bleach-heavy solutions on unpainted metal surfaces.
Apply a soft wash solution (3–6% sodium hypochlorite with surfactant) using a low-pressure sprayer or soft wash system. Allow 15–30 minutes dwell time. The chemistry kills the moss and its root system at cellular level. Rinse gently — the dead moss rinses away. For very established moss, a second treatment 2–4 weeks after the first is more effective than increasing pressure on the first visit.
Related guides
- How often to clean your roof — frequency recommendations by roof type and climate
- Roof inspection checklist — 27-point checklist before any cleaning or maintenance
- DIY vs Pro quiz — should you clean your roof yourself or hire out?
- Cleaning schedule generator — personalised 12-month maintenance calendar
- Roof cleaning cost guide — what professional cleaning costs in your area
Updated April 2026. PSI guidelines and ARMA method recommendations current as of 2026.