

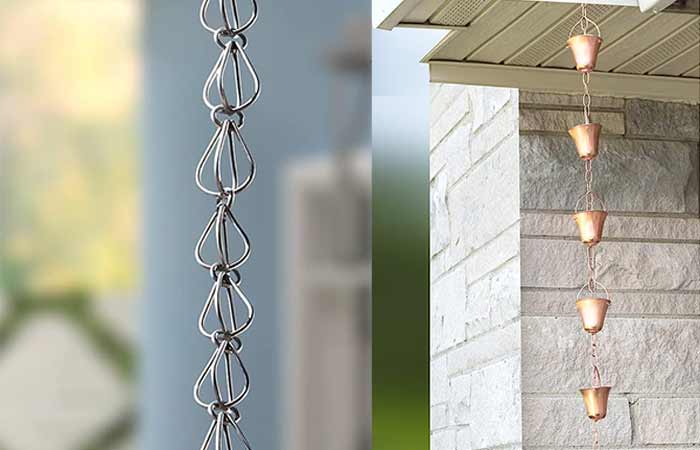
Are you looking to add a touch of elegance and functionality to your home’s exterior? Installing a rain chain is a fantastic way to achieve both. Rain chains not only enhance the aesthetic appeal of your property but also provide a captivating alternative to traditional dull and unattractive downspouts.
To install a rain chain identify where you want to place the rain chain, gather the required supplies, remove the downspout, hang and secure the piece in place.
Below, find step-by-step installation instructions, tips, and answers to frequently asked questions. Let’s dive in and discover how to set up a rain chain with ease and confidence.
Tool & Materials Needed
- Rain Chain Installation Kit: Chain, Basin, Anchor, Adapter, etc.
- Metal Tin snips
- Hanging bar
- Tape measure
- Gloves
- Ladder
- Hacksaw
- Stones or gravel (optional)
- Drill (optional)
- 2 1/4″ Hole Saw
- Sealant
Step 1: Select a Location
Determine the best place for your rain chain. Choose a spot where the rainwater can flow freely and avoid areas with obstructions or fragile surfaces.
Remember, rain chains aren’t just art; they can serve a function, too. So think about how rain falls outside your home, and decide accordingly. Think: where does your downspout flow into your yard? Into a landscaped area? Into a French drain? Into a rain barrel?
Identify areas of your outdoor space that could use a little extra water. Maybe that’s a landscaped area or an area that’s simply away from your home’s foundation
Step 2: Remove the Downspout
If you have an existing downspout, carefully remove it by loosening the screws or clips that hold it in place. Make sure to retain any necessary parts for potential future reinstallation.
Step 3: Prepare the Gutter
Adjust the gutters and prepare the location where the rain chain will connect to. If your gutter does not have an opening, you can use tin snippers to cut the gutter opening, making a hole for the rain chain.
You can also use a hole saw to drill a hole in the gutter where you want the rain chain to hang.
Always use extra care when working on a ladder.
Step 4: Install your Hanging Bracket or Hook or Bar
Place the hanging bracket included in your kit on the inside of the gutter with the hook hanging through the hole. If you do not have the hanging bracket a hanging bar usually looks more like a “U” or a “V,”. You can always bend a copper bar to create that shape.
Step 5: Prepare the Rain Chain
Unpack the rain chain and inspect it for any defects or damage. Make any necessary adjustments or repairs before proceeding with the installation.
Step 6: Hang the Rain Chain
It’s time to hang the rain chain from a hook. Depending on the design of your rain chain, it may require additional components. Follow the manufacturer’s instructions provided with the rain chain or kit.
Attach the rain chain securely to the gutter or downspout adapter using the appropriate method (hooks, or clips). Ensure a stable and reliable connection.
Step 7: Adjust the Length (if necessary)
Measure the length of the rain chain, considering the distance from the gutter or downspout to the ground or desired water collection point.
If the rain chain is too long, you may need to remove excess links or cups. Conversely, if it is too short, consider adding extension chains or links.
Step 8: Test the Installation
Run water through the rain chain to check the flow and make any necessary adjustments. Ensure that the water is directed away from the foundation of your home or into a suitable water collection system.
Step 9: Secure the Rain Chain
Depending on the weight or movement of the rain chain, you may need to secure it to prevent excessive swaying or damage, especially in areas with strong winds or heavy rainfall.
Consider anchoring the bottom of the rain chain using stakes or ground anchors for extra stability
Installation & Maintenance Tips
- For gutter designs with an existing gutter outlet (where you will not have to create an opening) , consider using a downspout or gutter adapter if your rain chain does not directly fit into the existing opening. These adapters facilitate the connection between the downspout and the rain chain.
- Regularly inspect and clean your rain chain to ensure proper functionality and to prevent clogs caused by debris or leaves.
- Some rain chains may require occasional oiling to maintain their shine.
- If you live in an area with heavy rainfall, consider using multiple rain chains or installing them in a parallel arrangement to distribute the water flow more evenly.
- Always follow safety precautions and manufacturer’s instructions when installing a rain chain. If you’re unsure or uncomfortable with the installation process, it’s recommended to consult a professional for assistance.
FAQS
Here are some frequently asked questions about rain chain installation:
What is the best time of year to install a rain chain?
The best time to install a rain chain is in the late spring or early summer before the rainy season begins. This will allow you to test out the rain chain and ensure it works properly before heavy rains hit.
Where should I hang my rain chain?
Given their decorative nature, you should hang your rain chains are where they can be observed – and heard – during a rain event. .For this reason, you can use them on front porches near the entry you’re your home or near the windows
Can I install a rain chain without a gutter?
Rain chains are typically designed to be attached to gutters but if your roof lacks a gutter system, you can still install a rain chain using a separate container or some specialized gutter-less kits to collect and guide the water. See detail here: How to Use Rain Chains Without Gutters
What should I put at the bottom of Rain Chains?
After installing a rain chain, it’s important to consider what to put underneath it to effectively manage the water flow and prevent soil erosion or pooling. Here are some options for what you can put under rain chains:
- Rain Barrel
- Gravel bed or pebbles
- Splash block
- Decorative basin or catchment area
Further Reading: Creative Drainage Ideas for a Rain Chain
Can I install a rain chain myself, or should I hire a professional?
Yes, you can easily install many rain chains on your own as a DIY project, especially if you have basic handyman skills.
However, if you’re uncertain about the process, have a complex gutter system, or lack the necessary tools, it’s recommended to hire a professional to ensure a proper and secure installation.
Can I install a rain chain on any type of gutter?
Rain chains are generally compatible with most gutter systems. However, it’s essential to ensure that your gutter has a suitable attachment point or downspout adapter for the rain chain to be securely installed.
Also, make sure that the materials from which your guttering system is made up are compatible with the chain materials. Incompatible materials, especially metals can lead to electrolysis.
Do I need any special tools or equipment for installation?
Basic tools such as pliers or a drill, a ladder, or a screwdriver may be required to adjust or attach the rain chain. Some rain chain kits include installation accessories, but generally, the installation process can be completed with standard household tools.
Can rain chains be used in cold climates?
Yes, rain chains can be used in cold climates. However, it is important to ensure that the rain chain is properly installed and maintained to avoid any damage caused by ice or snow buildup. It may also be helpful to choose a rain chain with larger cups or links to accommodate for potential freezing.
Do rain chains require any special maintenance?
Yes, rain chains do require some maintenance including regular inspection, cleaning or even oiling to ensure they remain in good condition.
What is the average lifespan of a rain chain?
The lifespan of a rain chain depends on the material it is made of and how well it is maintained. Copper rain chains can last for several decades with proper care, while aluminum rain chains may have a shorter lifespan. Regular cleaning and maintenance can help prolong the life of a rain chain.
How high should I hang the rain chain?
The height at which you hang the rain chain depends on personal preference and the location of the rain chain. Generally, it’s recommended to hang the rain chain low enough to capture the water effectively but high enough to avoid any splashing or water runoff issues.
What should I do if my rain chain is too long?
If your rain chain is too long, you can remove excess links or cups to adjust its length. Many rain chains are designed to be easily customizable, allowing you to remove or add components as needed. Alternatively, you can use extension chains or links to increase the length if your rain chain is too short.
Can I use a rain chain in areas with heavy rainfall?
Rain chains can work well in areas with heavy rainfall, but it’s essential to consider factors such as the capacity of the rain chain and the water flow rate.
In areas prone to heavy rainfall, it may be beneficial to install multiple cup-style rain chains or use a rain chain in combination with a larger downspout for optimal water management.
It is also important to ensure that the rain chain is properly installed and maintained to avoid any potential issues.
Remember, if you have specific concerns or questions about the installation process or your unique circumstances, it’s always a good idea to consult the manufacturer’s instructions or seek professional assistance for guidance.
More on Rain Chains
- Common Rain Chain Problems & Solutions
- Rain Chains vs Downspouts-Which is Better your Home?
- How to Choose the Best Modern Rain Chain- Key Factors+ Top-Selling Options
- How to Make DIY Rain Chains + Ideas for Unique Designs
Sources
- https://hgic.clemson.edu/factsheet/rain-chain/
- https://www.monarchabode.com/pages/monarch-rain-chain-wikipedia
- https://cals.arizona.edu/backyards/sites/cals.arizona.edu.backyards/files/p11-12_0.pdf