

Are you tired of the generic chains all over the market and do you have a burning desire to unleash your creativity in coming up with one that is truly one-of-a-kind? Let’s dive into the world of DIY rain chains and begin crafting your own masterpiece today!
This guide will walk you through creative ways of making unique rain chains at home using everyday materials while also providing tips on installation and maintenance.
Materials and Tools Needed for DIY Rain Chains
To create your own DIY rain chain, you will need a few key materials and tools. These include copper piping for the main structure of the rain chain, as well as decorative elements like glass beads, stones, ceramic pots, metal spoons, plastic cups, or even wine bottles.
You’ll also need chains or hooks for hanging the rain chain and basic tools such as pliers and wire cutters to assist with construction. With these supplies on hand, you’ll be ready to start making your unique rain chain designs!
Further Reading
- What exactly is a rain chain and how does it work? Plus more other FAQs
- Common Rain Chain Problems with Solutions
- Rain Chains vs Gutter Downspouts
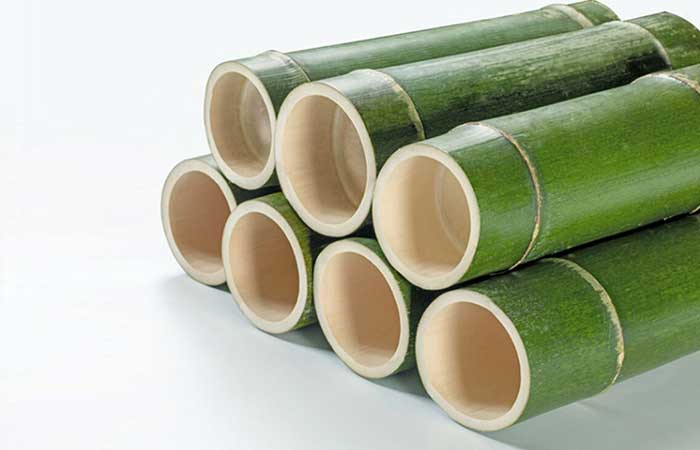
Copper Piping
Copper piping is a versatile material that works excellently in DIY rain chain projects. It’s not only strong and durable, ensuring your rain chain will last for years, but also has a natural beauty that ages gracefully over time, offering an elegant rustic charm to your outdoor space.
You can use it as the main structure of the rain chain or incorporate it with other materials like glass beads or stones for more visual interest. By bending and shaping copper pipes into swirls or loops, you can create unique designs that capture water beautifully during rainfall.
Copper tubing is not hard to find; check out hardware stores or online marketplaces to source this essential DIY rain chain material.
Decorative Materials
Glass beads, stones, ceramic pots, metal spoons, plastic cups and wine bottles can be ideal materials for a stunning DIY rain chain. Each adds its own unique charm to your outdoor space.
Take glass beads for instance; they catch the light during sunny days and reflect it in mesmerizing ways when wet. Stones – whether smooth river rocks or sparkling geodes – add an earthy touch while demonstrating the beauty of natural elements at work.
Ceramic pots have a rustic appeal that blends well into any garden setting and can often withstand weather changes very well. Metal spoons bring delightful sounds as raindrops hit them one by one creating an acoustic attraction to your home exterior.
Repurposing plastic cups is not only simple but also allows you to paint and design them according to your personal taste. By choosing colorful designs or patterns, you give these mundane items a new life that’s both functional and visually captivating.
And who says that wine bottles are just for recycling? Their shape funnels water effectively while adding an artisanal touch with their vibrant hues especially when sun rays shine through them!
Utilizing such commonplace items in creative ways will ensure your DIY rain chain stands out from the pack while also being environmentally friendly through upcycling efforts.
Chains or Hooks for Hanging
Chains or hooks are essential components of your DIY rain chain project. These not only serve as the backbone to hold all other decorative elements together, but they also add an aesthetic touch to your rain chain design.
From simple metal chains to ornate copper hooks, you have a multitude of options available at home improvement stores or online marketplaces. They’re typically easy to attach and secure with basic tools like pliers or wire cutters.
In fact, using copper tubing in combination with these can result in a chic natural rain chain that complements any outdoor space beautifully.
Bear in mind the weight and size of your decorative elements when choosing chains or hooks – sturdier items like rocks or wine bottles may require stronger supports for optimal function and safety.
Pliers, Wire Cutters, and other Basic Tools
These tools will come in handy when working with materials like copper piping and attaching decorative elements to your rain chain.
Pliers are essential for bending the copper pipe into intricate swirls or shapes, while wire cutters make it easy to trim the pipe to the desired length.
With these tools at hand, you can let your creativity flow and bring your unique rain chain design ideas to life!
Step-by-Step Guide to Making Different Types of Rain Chains
Learn how to make your own DIY rain chains with our step-by-step guide, including copper swirls, glass beaded, terracotta pot, metal spoon, plastic cup, and wine bottle rain chain designs.
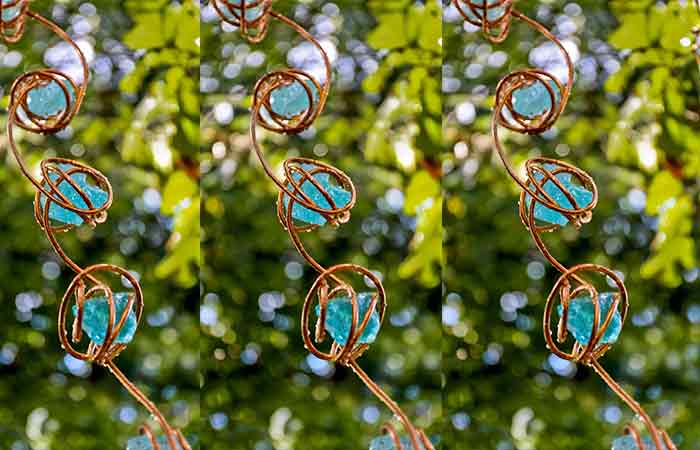
Copper Swirls Rain Chain
Create a stunning rain chain for your outdoor space using beautiful copper swirls. Follow these simple steps to make your very own DIY copper swirls rain chain:
1. Gather Your Materials
- Copper piping
- Pliers and wire cutters
- Chains or hooks for hanging
2. Measure and Cut the Copper Pipe
Start by measuring the desired length of your rain chain. Cut the copper pipe into equal lengths using wire cutters, ensuring that each piece is long enough to hang freely.
3. Create the Swirls
Using pliers, bend one end of each copper pipe into a swirling shape. The size and shape of the swirl are up to you – get creative and experiment with different designs!
4. Attach the Chains or Hooks
Once you have created all your copper swirls, attach them to chains or hooks that will allow them to hang from your gutters or roof overhang. Make sure the chains are securely fastened.
5. Hang Your Rain Chain
Find a suitable location for your rain chain – it could be near a downspout or in an area where water naturally flows during rainfall. Hang it securely, making sure it has enough room to sway in the wind.
6. Enjoy Your Beautiful Rain Chain
Sit back and watch as rainwater cascades down through the intricate copper swirls, creating a mesmerizing visual display in your garden or yard.
Glass Beaded Rain Chain
Add a touch of elegance and sparkle to your outdoor space with a glass beaded rain chain. This unique DIY project is not only functional but also adds a beautiful decorative element to your surroundings. Here’s how you can make your own glass beaded rain chain:
Materials needed:
- Copper piping
- Glass beads in different shapes and colors
- Chains or hooks for hanging
- Pliers, wire cutters, and other basic tools
Steps
- Cut the Copper Pipe
- String the Glass Beads
- Attach Chains or Hooks
- Hang Your Rain Chain
- Enjoy Your Beautiful Creation
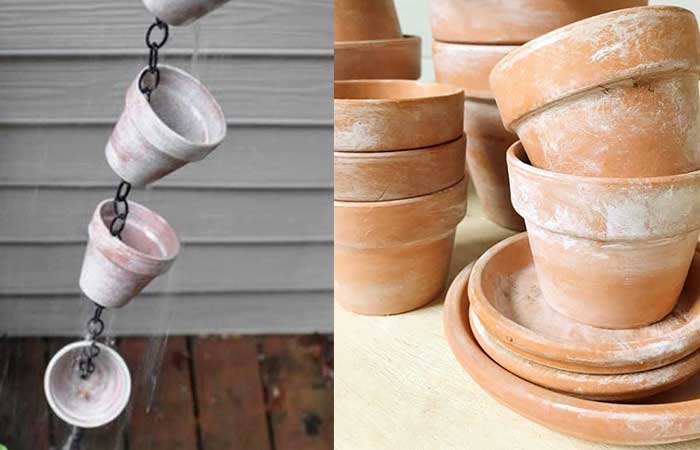
Terracotta Pot Rain Chain
Create a unique and eye-catching rain chain by incorporating terracotta pots into your design. Follow these simple steps to make your very own Terracotta Pot Rain Chain:
Materials needed:
- Copper piping
- Terracotta pots in various sizes
- Chains or hooks for hanging
- Pliers, wire cutters, and other basic tools
Steps
- Drill at the bottom of the pots
- Use a chain or copper tubing to link the pots-cut the copper piping into equal lengths, depending on how long you want your rain chain to be.
- Take one of the terracotta pots and thread the copper pipe or a chain through the hole in the bottom of the pot.
- Using pliers, bend the end of the copper pipe slightly to secure it inside the pot. This will prevent it from falling out.
- Repeat this process with as many terracotta pots as you desire, spacing them evenly along the length of the copper pipe.
- Once all the pots are attached, connect them together using chains or hooks.
- Hang your rain chain in a suitable location where it can catch rainfall effectively.
Metal Spoon Rain Chain
To create a unique rain chain for your DIY project, consider using metal spoons. Metal spoon rain chains can add a charming and whimsical touch to your outdoor space. Here’s how to make one:
1. Gather materials
- Metal spoons (preferably stainless steel or silver-plated)
- Chains or hooks for hanging
- Pliers and wire cutters
2. Prepare the spoons
Start by bending the handles of the spoons slightly downward using pliers.
Create a hole at the top of each spoon handle using a drill or hammer and nail.
Thread a small piece of chain through each hole, securing it with pliers.
3. Connect the spoons
Attach the spoons together by connecting the chains. You can use additional small pieces of chain or mini jump rings for this purpose.
Ensure that each spoon is evenly spaced apart from one another.
4. Hang the rain chain
Hang the completed metal spoon rain chain from a sturdy hook or other fixture in your desired location.
Make sure it is securely fastened so that it can withstand wind and rainfall.

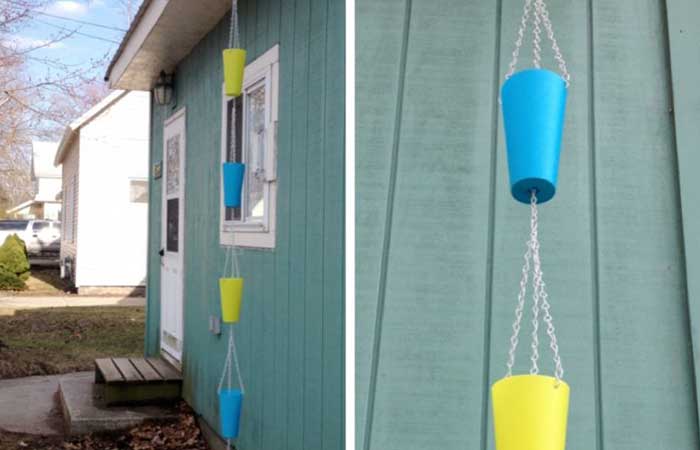
Plastic Cup Rain Chain
Create a unique and eye-catching rain chain by repurposing plastic cups. With just a few simple steps, you can transform ordinary plastic cups into a stylish and functional addition to your outdoor space. Here’s how:
1. Gather Your Materials
- Plastic cups (choose a color or design that matches your aesthetic)
- Chains or hooks for hanging
- Pliers
- Wire cutters
2. Prepare the Cups
- Start by drilling a small hole in the center of each cup’s bottom using a drill bit that matches the size of your chains or hooks.
- Repeat this step for all the cups you plan to use.
3. Arrange the Cups
- Determine the desired length of your rain chain and cut the chain accordingly using wire cutters.
- Attach one end of the chain to a hook or hang it from a secure structure.
- Thread one cup onto the chain, starting from the bottom and sliding it up until it reaches the desired height.
- Repeat this process for each cup, spacing them evenly along the chain.
4. Secure the Cups
Once all the cups are threaded onto the chain, use pliers to bend and squeeze each cup’s rim slightly inward.
This will keep them securely in place while allowing water to flow through.
5. Hang and Enjoy
Find an ideal location to hang your plastic cup rain chain, ensuring that it will catch rainfall effectively.
Use hooks or attach them securely to a downspout or gutter system for proper drainage.
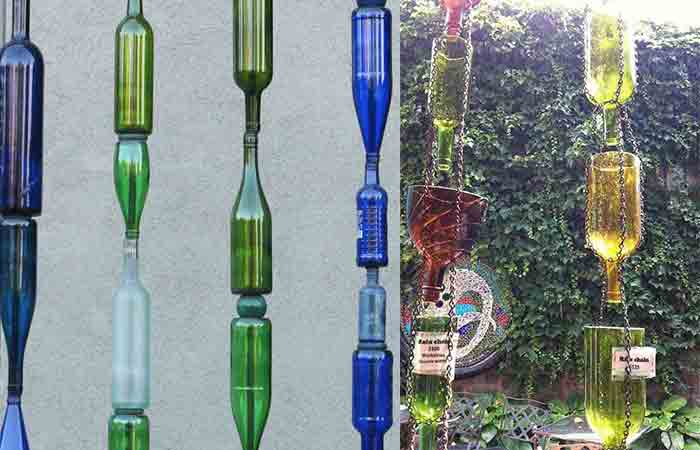
Wine Bottle Rain Chain
Create a unique and eco-friendly rain chain by repurposing wine bottles. Follow this simple DIY guide to make a stunning wine bottle rain chain for your outdoor space:
- Start by collecting empty wine bottles of different shapes and colors. Rinse them thoroughly to remove any residue.
- Remove the labels from the bottles by soaking them in warm soapy water or using a label remover solution.
- Once the bottles are clean and label-free, you can choose to leave them as is or add decorative elements such as beads, charms, or paint. Get creative and personalize each bottle to match your style and outdoor decor.
- To create the rain chain, you will need metal wire or strong string that can withstand the weight of the bottles. Cut the wire into equal lengths, depending on how long you want your rain chain to be.
- Attach one end of the wire to the neck of a wine bottle by wrapping it tightly around the bottleneck multiple times. Make sure it is secure.
- Thread the other end of the wire through the bottom opening of another wine bottle and secure it in place just like before.
- Continue this process until all your wine bottles are attached to each other, forming a beautiful cascading chain.
- Ensure that each bottle is securely fastened to prevent any accidents during windy weather or heavy rainfall.
- Once your wine bottle rain chain is complete, find a suitable spot in your garden or patio where it can hang freely without obstruction.
- Hang the rain chain from a sturdy hook or attach it directly to an existing gutter system if available.
- During rainfall, watch as water flows down from bottle to bottle, creating an enchanting visual display and soothing sound.
- Remember to periodically check your wine bottle rain chain for any signs of damage or wear due to exposure to weather conditions. Replace any broken bottles or repair loose wires promptly.
Creative Design Ideas for Rain Chains
Get inspired with these creative design ideas for your DIY rain chains. Incorporate unique elements like sea glass or shells, add the warmth of wood, or bring a touch of glam with crystals or gems.
Don’t be afraid to think outside the box – consider using found objects such as keys or tart tins to make your rain chain truly one-of-a-kind. Turn heads with a stunning outdoor space that speaks volumes about your style!
Using Sea Glass or Shells
Create a unique and beach-inspired rain chain by incorporating sea glass or shells into your design. These beautiful natural elements add a touch of color and texture to your DIY project.
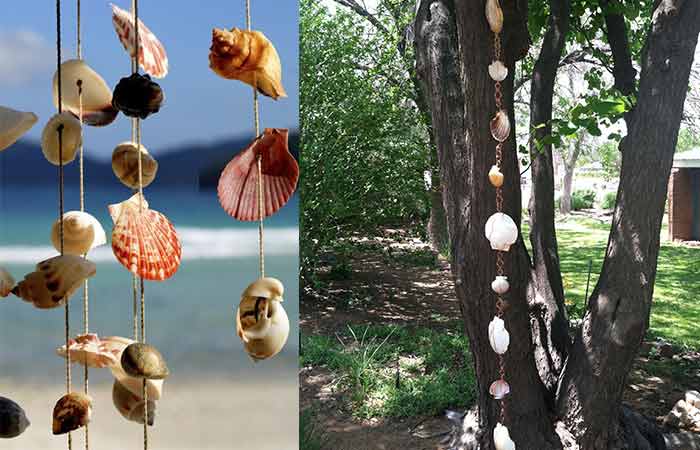
You can attach them directly onto the copper piping using wire or string, or create decorative charms with small holes drilled into them.
The sea glass or shells will dangle beautifully in the rain, creating a mesmerizing display as water cascades down the chain.
It’s a simple yet creative way to bring the beauty of the ocean into your outdoor space.
Incorporating Wood Elements
One creative way to add a natural and rustic touch to your DIY rain chain is by incorporating wood elements. You can use driftwood, wooden beads, or even small wooden birdhouses as decorative elements along the length of your rain chain.
These wooden accents not only provide visual interest but also create a warm and inviting atmosphere in your outdoor space.
For a more unique design, you can try using tree branches or twigs as the main structure for your rain chain. Simply cut them into different lengths and drill holes through each piece to thread the chains or hooks.
This creates a charming and organic look that blends seamlessly with nature.
Another idea is to attach small wooden plaques or tags with inspirational quotes or personalized messages onto the chains of your rain chain. This adds a personal touch and makes it truly one-of-a-kind.
Adding Crystals or Gems
Adding crystals or gems to your DIY rain chain is a great way to add some sparkle and elegance to your outdoor space. These beautiful embellishments can create a stunning visual effect when the rainwater flows down the chain, reflecting light and creating a magical ambiance.
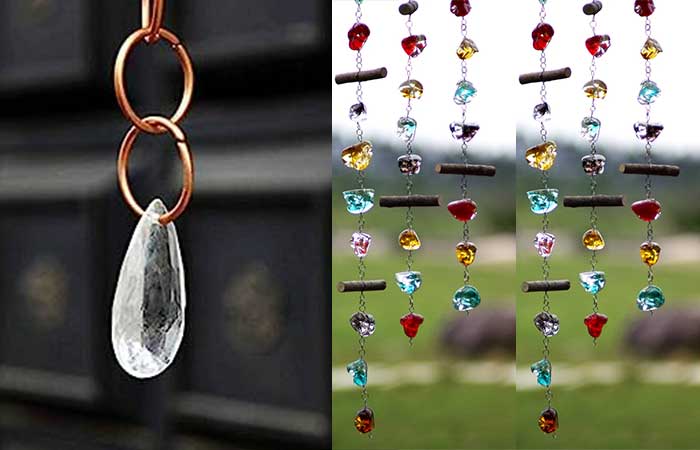
You can choose from a variety of crystal or gem options, such as quartz, amethyst, or even colorful glass beads. Simply string them onto the chain in between other decorative elements like copper swirls or ceramic pots for an eye-catching design that will impress everyone who sees it.
Let your creativity shine by incorporating these dazzling additions into your homemade rain chain project!
Using Unique found Objects like Keys or Tart Tins
If you’re looking to add a touch of whimsy and creativity to your DIY rain chain, consider using unique found objects like keys or tart tins. These unconventional items can bring a sense of charm and personality to your outdoor space.
You can easily repurpose old keys by attaching them to the chain with small hooks or rings, creating a delightful tinkling sound as the rainwater cascades down. Tart tins, on the other hand, offer an unexpected twist with their shallow basin-like shape that catches and directs the water in an eye-catching manner.
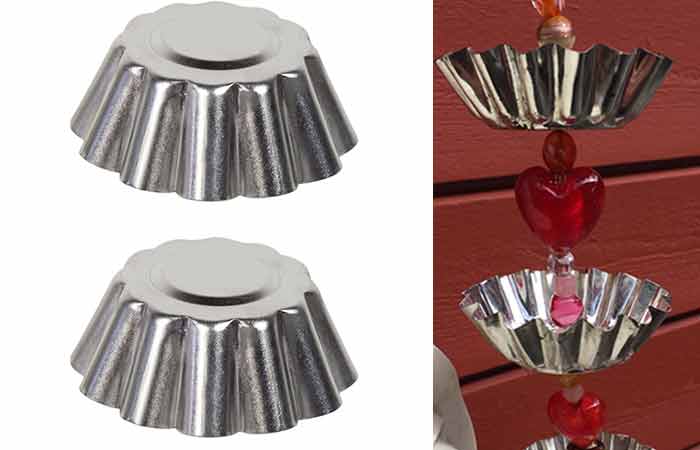
This is just one example of how you can think outside the box when it comes to designing your own personalized rain chain. Let your imagination run wild and discover new ways to incorporate everyday objects into this functional yet decorative element for your outdoor area.
Tips for Hanging and Installation
When hanging your DIY rain chain, make sure to choose the right location that allows for proper drainage. Use chains or hooks to secure the rain chain properly and ensure it can withstand heavy rainfall.
For maintenance, regularly clean and polish your rain chain to keep it looking its best. Check for any damage or wear and make repairs as needed. Discover more helpful tips for hanging and installation by reading the full article!
Choosing the Right Location
To ensure the effectiveness and aesthetic appeal of your DIY rain chain, it’s crucial to choose the right location for installation. Look for an area where water runoff from your roof or gutter can easily flow into the rain chain.
Ideally, this spot should be visible from a window or outdoor seating area so you can enjoy the beautiful cascading effect when it rains.
Consider factors such as wind direction and tree coverage, as these can affect how much rainfall reaches your rain chain. You’ll want to place it in a spot that receives a decent amount of rainfall while also being protected from heavy winds that could cause excessive splashing or damage to nearby plants.
Remember, installing your rain chain near a garden bed or walkway adds visual interest and creates an enchanting atmosphere during rainy days. Plus, positioning it close to any outdoor features like fountains or natural rocks can enhance its overall charm.
Securing the Rain Chain Properly
To ensure that your DIY rain chain stays securely in place, it’s important to take proper measures for securing it. One option is to attach the rain chain to a downspout or gutter using hooks or brackets designed specifically for this purpose.
This will provide stability and prevent the rain chain from swaying in strong winds. Another method is to use a sturdy stake or post, firmly planted into the ground, to hang the rain chain from.
This way, you can create a focal point anywhere in your outdoor space without needing any existing structures. Whichever method you choose, it’s crucial to make sure that the rain chain is securely fastened so that it can withstand heavy rainfall and keep flowing water safely directed away from your home.
Further Reading: How to Install a Rain Chain Properly
Ensuring Proper Drainage
Proper drainage is essential for the effectiveness of your DIY rain chain. Without it, water may not flow properly and could potentially cause damage to your home or garden. To ensure proper drainage, make sure that there are no obstructions in the path of the rain chain.
Clear away any debris or leaves that might accumulate and block the flow of water. Additionally, consider adjusting the length of your rain chain so that it hangs at a suitable height to allow water to freely flow into a designated area such as a rain barrel or garden bed.
By ensuring proper drainage, you can enjoy both the aesthetic and functional benefits of your DIY rain chain without worrying about potential issues.
Further Reading: 13 Creative Rain Chain Drainage Ideas
Maintenance and Care
To keep your DIY rain chain looking its best, regular maintenance and care are important. Following are some care and maintenance tips
Cleaning and Polishing
To maintain the beautiful appearance of your DIY rain chain, regular cleaning and polishing are essential. Over time, dirt, debris, and weather elements can dull the shine of your rain chain.
To restore its luster, start by gently rinsing off any loose dirt or grime with water. Then, mix a solution of mild dish soap and warm water in a bucket. Use a soft cloth or sponge to scrub the rain chain thoroughly.
For copper rain chains, you can restore their natural patina by using a mixture of equal parts white vinegar and salt. Apply this solution to the rain chain using a cloth or sponge and let it sit for about 30 minutes before rinsing it off with water.
After cleaning, dry the rain chain thoroughly with a clean towel to prevent water spots or streaks from forming. Finally, give it an extra shine by applying metal polish specifically designed for copper or other metals used in your DIY creation.
Checking for Damage or Wear
To ensure the longevity and functionality of your DIY rain chain, it’s important to regularly check for any signs of damage or wear. Over time, weather conditions and natural elements can take a toll on your rain chain.
Inspect your rain chain periodically to identify any cracks, chips, or loose components that may need repair or replacement.
By keeping an eye out for these issues, you can address them promptly and prevent further damage. For example, if you notice a cracked glass bead on your beaded rain chain, replace it with a new one to maintain its aesthetic appeal.
Similarly, if the copper piping is showing signs of corrosion or rusting, consider polishing it or applying a protective coating to prevent further deterioration.
Making repairs
When it comes to maintaining your DIY rain chain, regular maintenance and making repairs when necessary are essential. Keep an eye out for any signs of damage or wear, such as loose beads or broken chains.
To prevent further damage, promptly fix any issues you find. This might involve reattaching a bead with some wire or replacing a damaged chain link with pliers. By being proactive in repairing your rain chain, you can ensure its longevity and continue enjoying the beauty it brings to your outdoor space.
By following these simple maintenance steps, your DIY rain chain will continue to add beauty and charm to your outdoor space for years to come.
Benefits of DIY Rain Chains
DIY rain chains offer numerous benefits for your outdoor space. Apart from the obvious advantages like channeling rainwater from your roof and adding visual appeal and unique touch to your garden or patio, they also have the following benefits
Creates a Unique and Personalized Design
One of the great benefits of creating your own DIY rain chain is that it allows you to express your creativity and create a unique design that reflects your personal style. With countless materials and decorative elements to choose from, you have the potential to make a rain chain that truly stands out.
Whether you incorporate sea glass or shells for a beach-inspired look, add wood elements for a natural feel, or use crystals and gems to add some sparkle, the possibilities are endless.
By customizing your rain chain with these creative design ideas, you can transform it into a stunning focal point in your outdoor space.
Recycles and Repurposes Materials
Creating your own DIY rain chain not only adds visual appeal to your outdoor space, but it also allows you to recycle and repurpose materials, making them an eco-friendly option for those who are conscious of their environmental impact.
With a little creativity, you can transform everyday objects into unique and personalized rain chains.
For example, you can use glass beads, stones, ceramic pots, metal spoons, plastic cups, wine bottles or other decorative elements that would otherwise go to waste.
By giving these items a new purpose in your rain chain design, you are not only reducing waste but also making your garden or patio safe for the environment.
If you are into DIY crafts here is how to get the best rain chain
FAQs
1. What materials do I need to create a DIY rain chain?
To create your own DIY rain chain, you will need materials such as copper or aluminum piping, wire cutters, pliers, S-hooks, and decorative elements like beads or bells.
2. How do I design a unique rain chain?
Designing a unique rain chain involves choosing a creative pattern or theme for your chain. You can incorporate various elements such as different types of beads, colored glass pieces, seashells, or even repurposed items like vintage keys or small watering cans to make it truly one-of-a-kind.
3. Can I customize the length of my DIY rain chain?
Yes, you can easily customize the length of your DIY rain chain by cutting the piping to desired lengths using wire cutters. This allows you to adapt the length based on the specific location where you intend to install it.
4. Is creating a DIY rain chain difficult?
Creating a DIY rain chain is generally considered an intermediate-level project that requires some basic tools and skills. However, with proper instructions and guidance from tutorials available online or in craft books, most people with some experience in crafting should be able to successfully create their own unique rain chains without much difficulty