
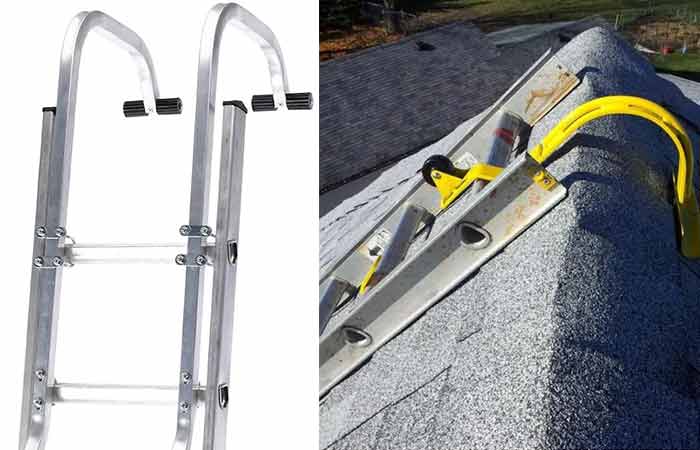
If you have work to do on the roof, you might find it hard doing it given the sloping nature of most roofs. While tasks close to the gutter are easy to work on, those at the top of the roof especially close to the apex are quite tricky. Your ladder can’t stay on the apex hence the need for a roof ladder with a hook or the addition of a roof ladder hook on your current ladder.
Buying a roof ladder is quite costly let alone time consuming as you need to buy it then wait to have it delivered to your door. As for roof ladder hook, it can cost you a lot, may not work with your type of roof or ladder and also needs to be delivered. This may be too late when your roof is leaking in the rainy season.
The solution on our hands is making your own roof ladder hook. This can help you climb the roof right to the apex without the risk of falling off. You have several ways of making a roof ladder hook and we will deal with two below. You can choose which one to use depending on the materials you have.
Method 1: Making a Wooden Roof Ladder Hook
For this method, you’re going to make a roof ladder hook made of wood.
Supplies
You’ll need the following materials:
- Standard 12-foot ladder
- 4 short boards of plywood
- 2 long plywood boards
- Wooden boards
- Drill
- Two clamps
- Protractor
- Screws
- Measuring tape
- Nails
- Wood saw
- Pencil or marker
Method
You then follow these steps:
1. Measure the pieces of wood
The first step in this process is to measure the pieces of wood to ensure they meet your needs. Put the two pieces of wood side by side then check whether they’re of the same length and width. This can be easy to see with both naked eye. If not, you can always use the tape measure to check their dimensions. If one’s longer than the other, cut of the excess part with the saw.
While still keeping them side by side, measure 2/3 of the length of the pieces with the tape measure then mark this length with a pencil or marker.
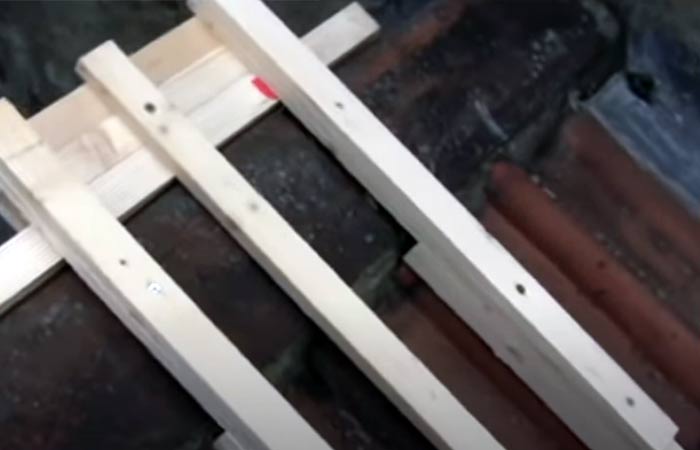
2. Position the wood on the ladder
Hold one piece of wood such that it’s on the outside of the ladder and the longer part is on the lower side of the ladder while the shorter part on the upper side. The ladder should be placed on a raised platform to mimic the slope of the roof.
Use a clamp to fasten the wood to the ladder to make it easy to work on it.
3. Drill the ladder and wood
With the piece of wood held to the outside of the ladder at the top end, drill a hole to go through the ladder and piece of wood. You only need to drill one hole for this task as you won’t need the second hole until you get the angles right. Remember, the roof at the apex is often 45 degrees and not 90°. That, however, will be taken care of in the later stages of this process.
Repeat for the other piece of wood making sure the longer part of the wood is on the lower side of the ladder (the 2/3) and the shorter side on the upper side (the 1/3). Place the piece on the outside then drill a hole through it and the ladder. Put the screws or bolts and nuts through them then tighten a bit.
4. Check the angle of the wood and ladder
Using the protractor, measure 45 degrees between the ladder and the wood on the shorter side of the pieces of wood. You can confirm this angle by measuring 135 degrees on the lower side of the angle between the ladder and the piece of wood (135° + 45° = 180°).
These angles, however, are not the standard for every roof and you will have to find the angle for your roof. You can do so by going to the end of the roof then measure the angle at the apex of the roof between the two slopes of the roof. You can do the same inside the roof or on the top at the apex.
Mark these angles on the piece of wood in readiness for the next steps.
5. Lock in the angle
Once you have the angle you desire, get a short piece of wood, drill it with the ladder on the inside a rung or two from the top of the ladder. Put a screw or bolt and nut through it to fasten it to the ladder. Don’t tighten it too much as it’ll still need to move about.
Adjust the longer wooden piece at the top to the angle you desire. Bring the shorter piece of wood to meet the longer one (which is still at the measured angle). Drill a hole to join the two pieces of wood then put a bolt through this hole. You can tighten the boosts to lock in the pieces. Do the same for the other side of the ladder.
6. Add reinforcements
Once the two pieces of wood are in place, the next step is reinforcing them so that the ladder is strong enough to bear your weight. You should put the reinforcements in two places namely at the junction of the two pieces of wood, and at the other end of the longer pieces of wood.
For the first reinforcement, take a piece of wood then place it under the joint between the two pieces of wood already fixed to the ladder. Measure the length needed then cut it to shape. With the drill, make a hole passing through the longer piece of wood to the new one then put a bolt and nut in it. Do the same for the other piece of wood. I found out that the drilling can weaken the pieces of wood. You can use nails from the supporting piece of wood’s side to hold it in place instead.
The second reinforcement is placed at the lower end of the longer pieces of wood. Measure a piece of wood joining the two longer pieces from the lower side. Cut off the excess lengths of the joining piece of wood then use nails or screws to join it to the two pieces.
The reason you place the supporting piece to the lower side is to protect the roofing materials. This is because the weight of the ladder will be exerted on the joining piece rather than the longer ones. It also reduces the angle of the hook making it better at keeping the ladder in place.
7. Add more reinforcements
Remember the first pair of screws we drilled into our ladder? The ones on either side holding the pieces of wood to the ladder? You should now add another pair one on either side of the ladder to reinforce it further. After that, look for any other joints which aren’t strong enough then add screws or pieces of wood.
8. Place the ladder onto the roof
As you might have noted, this is no longer a normal ladder and placing it on the roof will require some skill and energy on your end. You can do this by lifting it up and placing it right on the apex ridge of the roof. The ladder will be on one face of the roof then the hook on the ridge with a small part of it on the opposite face of the roof.
Just like that, you have a roof ladder hook adding safety to your work on the roof. Observe the safety measures of using ladders and enjoy your ladder.
Method 2: Making a Metal Roof Ladder Hook
The method above can be intimidating to some as it needs lots of measuring and cutting and other activities. It is very safe even for a learner in my view. The alternative is to make a metal roof ladder hook as shall be described below. This method, however, is also a bit dangerous as you’ll be dealing with hot metal. With care, you can pull it off quite easily.
Supplies
You need the following items:
- Metal bar preferably made of steel
- Metal clamps
- Blow torch
- Pieces of wood joined at a 45-degree angle thus forming a V shape.
Method
You then follow these steps:
1. Set up your work station
First, you need to put up the two pieces of wood such that they make an inverted V shape. That means that the two ends of the V will be on the ground while the ridge is at the top of the shape. Ensure the structure is firmly held in place to avoid toppling over when you’re using it.
2. Bend the steel
While you have a choice between many types of metals, you should focus on using steel since it’s the most reliable. Other metals might bend when under stress from the weight of the ladder and the user.
On one side of the V shape, fasten the steel rod such that at least half of its length is hanging over the apex of the V shape. You can use one of the metal clamps to get a steady grip on the metal.
Heat the middle of the steel rod with the blow torch until it starts turning red. As you might have already noticed, you need to be very careful with this procedure to avoid burning yourself with the hot metal or blow torch.
Once the metal is hot enough, use the other metal clump to hold its loose end. Bend it downwards towards the other leg of the inverted V shape as much as you can. If it can touch the other leg, the better.
3. Add handles
You then need to add handles to the hook to hold the ladder on one end and the roof on the other end. Simply heat the ends of the hook with the blow torch then bend them into the handles you desire. You can add rubber or cloth on the end in contact with the roof to avoid damaging the roof with the hook.
4. Put the hook on the roof
Your metal hook will be ready with the steps above. Simply lift the ladder with the hook attached then place it over the roof with the hook over the ridge of the house and you’re good to go.
The good news is that you don’t need to be accurate with this type of hook as any angle will work. As long as the hook is bent enough to carry the weight of the ladder and the user, you’re safe. You can make two hooks for your ladder for better support.
Safety measures to observe
Besides the precautions when using a ladder, you should also be careful when making them with the above processes. You should observe the following precautions:
- Use thick gloves, googles and protective clothing when working with hot metal.
- Be careful with nails and hammers as you might hit your hands and the nails can prick you. Make sure the ground is clear at your workplace to avoid stepping on nails and saws.
- Saws also present a challenge as they can easily cut your hand to shreds. Always have your hand at a safe distance and cut the wood without removing the saw from the wood with each stroke.
- Make sure the ladder you use has functioning locks which are in good condition as well.
- Never climb the roof without a spotter. That’s someone on the ground or on another ladder to check on your progress as you work on the roof. This person can help prevent fatal accidents.
- If the work is delicate, use a harness fastened on a stable part of the roof and around your own body.
- Given that you’re using the ladder on the roof, make sure that it’s properly anchored at the hook before you climb the ladder. If there’s another way you can anchor it such as using a piece of rope, do that as well.
- Keep away from power lines as they pose a major risk when you’re on the roof. If you have some around, call an expert to do the roof work instead.
- A harness will add to the safety of your rooftop activities. Buy a quality harness then tie it around your body and a stable point on the roof. If your ladder fails, the harness will prevent the accident.
- Before going up the roof, make sure you have inspected the integrity of the roof as you will be transferring weight to it. The best way to do this is through the attic where you can check the health of the wooden beams and other parts of the roof.
- Always protect the roof with padding when placing a ladder on it. This is especially important when dealing with asphalt roofs as they’re quite delicate. Ladder pads are your best bet in this case.
- The ladder you use should be inspected to make sure it has no broken or loose parts that may lead to its breaking and your falling.
- The ladder’s duty rating should help you decide on whether it’s steady enough to load a certain amount of weight on it. This figure is usually written on the ladder and should be your guide when using it. The rung locks should be spring-loaded to provide the most stable and safest experience. These same locks should always be engaged before you use the ladder for your safety.
- Before you use the ladder on the roof, make sure the roof does not have any dirt or debris that may make it slippery. If you find any dirt on the roof, clear it off before performing work there.
- Avoid going on the roof when it’s wet unless absolutely necessary. In this case, the position of the ladder can allow you do that since you’ll be entirely on it rather than the roofing materials.
- Keep off ladders if you have a phobia for heights. By now you should be knowing your fears and going on the roof where you’re the highest point around with a fear of heights is very risky as you might fall off from dizziness.
- At all times, keep the rungs of the ladder horizontal. This prevents slipping both for you and the ladder. This should always be kept in mind unless the ladder is secured and the risk of falling is much less.
- Given that the ladder is merely hooked onto the roof, avoid swaying side to side or backwards to prevent accidents from happening. Besides sliding off the roof, there is the risk of breaking the hook and falling off.
These precautions help in keeping you and those on the ground safe when working on the roof. In most cases, a well-prepared hook eliminates the need to climb on the roof without proper support. You can easily slide it to the side then work on another part of the roof.
More on Ladders and Roofs