
Roof leaks can be quite annoying. They can mess the look of the house and even destroy he whole property. Finding the actual location of the leak is a major issue and may require the input of an expert to locate it. Besides that, fixing the leaks is also difficult as it requires some skills on your end.
The good news is that a lot of leaks, once identified, won’t take too much of your time and money to fix. The available solutions require that you have yourself the most common tools such as a hammer, hacksaw, nails and other items as per the type of repair to be made.
While we’ll give advice on what to do for each type of leak, you may need the input of an expert especially for the complex repairs. Also, climbing the roof isn’t an easy task as it’s fraught with risks. Besides that, don’t attempt to fix the roof if you’re not sure of what you’re doing. If you harbor any doubts with your skills, consult an expert. It’ll save you lots of time and money in the long term.
As you might have correctly guessed it, the type of solution for a roof leak will depend on the cause of the leak. For ease of providing directions, we shall bundle the causes and solutions together as shown below:
Fixing Skylight Leaks
Skylights make our houses look good but are among the most likely sources of roof leaks especially when fixed poorly or in areas with extreme temperatures. The primary sources of skylight leaks are poor measurements which leaves spaces between the rest of the roof and the skylight, and poor sealing around the skylight. These are fixed as follows:
- For the poorly measured skylight, you’ll need a new skylight measured to the space allowed in the roof. This new skylight will need to be fitted properly with the sealing around it done to keep out water from seeping into the house.
- For the sealing issue, use a putty knife to remove the current seal then reapply a new coat of seal as tightly as possible. A silicone sealant is the best as it doesn’t get washed away by the water.
While you can undertake the resealing exercise, fitting a new skylight on the roof will need the skill and experience of a professional.
Dealing with Ice Dam Leaks
Ice dams are the large pieces of ice that form at the edge of the roof during a snowfall. They form as a result of the melting of snow from the upper warmer sections of the roof getting frozen into ice at the edges of the roof where the temperature is still low.
Heat from the house rises and melts the snow in the upper sections of the house. As this snow melts, it flows to the colder sections of the roof where it’s cooled to ice. As more water melts to these sections, more ice is formed. This ice dam blocks the water from flowing off the roof.
The sedentary water can easily get under the shingles and into the house as a leak. Left for too long, ice dams can get heavy enough to break the roof. The ice can also spread to the whole roof thus putting pressure on your roof.
The solution to this issue is getting rid of the ice dam first. There are several ways of doing it including the following:
Using pressurized steam to melt and blow away the ice dam
Steamers are used to melt the ice away. Such kinds of steamers are available with professionals since there are risks involved with their use. For example, the steam can damage the shingles or roofing tiles if not handled properly. Also, the pressure can do away with the flashing around the shingles leading to more leaks.
Using salts to melt the ice away
You should get the right salts as the wrong ones can corrode your roof giving you more problems to deal with.
These methods can be undertaken at home although you should take the needed precautions.
Vent Leaks Fix
Roof venting plays the role of allowing moisture from inside the house to escape to the outdoors thus preventing condensation in the attic. If they malfunction, they lead to trapped moisture in the roof which can also lead to the growth of mildew and mold. Malfunctioning roof vents can also allow water into the roof especially when their rubber boots and flashing are compromised.
You can fix the roof venting as follows:
- Start by removing the rubber and seal around the vent.
- You then remove the seal connecting the vent to the shingles nearby.
- Place the new boot just below the shingles and around the vent to make a sturdy and watertight seal.
- Place the surrounding shingles in place then secure them with nails and flashing.
- Apply a sealant to complete the task.
If the pipe in the vent is broken or compromised in another way, you can replace it with one of a similar size and material.
Shiner Leaks
A shiner is a roof nail that missed its mark on the roofing beams and thus hangs inside the attic only attached to the shingles above it. This often leads to leaks as the nail will be a bit loose and water and snow enter along it into the house.
The only solution you have for this kind of leak is as follows:
- Pull out the nail from the roof then seal off the hole left behind.
- Use a new nail to secure the shingle whose nail missed the roofing beam as needed.
- Seal of any holes or loose parts left behind.
This is something you can easily do yourself if you can safely get to the roof and work from it.
Gutter Leaks
Gutters can develop leaks due to breaking, holes or being clogged with twigs and leaves. For each cause of the leak, your gutter will leak water to the rest of the roof with fascia boards likely to rot due to exposure to water. This type of leak can be fixed quite effectively at home and rarely would you need the input of an expert.
The solutions include the following:
Replacing gutter sections
The only lasting solution to broken gutter sections is replacing them altogether. While you can put in place some temporary solutions, replacing the broken parts will serve you for much longer.
Sealing holes
Gutter holes can be sealed quite effectively with the right sealant depending on the type of gutter material. This is because plastic gutters require a different type of sealant from aluminum ones. In most cases, you’ll need a silicone sealant and asphalt roofing cement. Always seal the gutter from the inside and use warm roofing cement or work on a warm day for the best results.
Removing debris
Twigs, leaves and even some sand can fill up your gutter leading to the overflow of water. This is a simple exercise which entails removing them by hand. To prevent such cases, use a mesh over the gutter to keep the debris out. The closed sections of the gutters such as the pipes delivering water to the tank can be clogged easily leading to spills. Check the joints especially for this issue.
Support hanging gutters
At times, your gutter may not be punctured or broken or even clogged but simply spilling water due to hanging loose. This often occurs during a heavy downpour when lots of water overwhelms the gutters making them hang loose and spill water.
The remedy to this issue is using clip hangers or spike-and-ferrule hangers to make the gutters sturdily attached to the roof.
Correct the degree of drop of the gutters
While they may seem horizontal, gutters are created such that they drop ¼ of an inch for every 10 feet of length towards the downspouts. If the drop is less than that, water can easily fill up the gutter leading to overflows and leaks on the roof.
For this fix, you’ll need a measuring tool such as a tape measure to ensure the drop is enough for the water to run freely to the downspout.
Direct water away from the house
If your gutters don’t pour water into a tank, you’ll need to pour it away from the foundation of the house as water in large amounts easily spoils your foundation. This can be fixed in the following ways:
- Using an automatic recoiling downspout which folds up when there’s not water running down the gutter. This prevents animals from crawling upwards the gutter downspout when there’s no water flowing out. When it rains, the weight of the water uncoils it and it pours water some distance from the building.
- Using a 4-inch ABS drainpipe buried in the ground to drain the water deep into the ground where it can’t affect the foundation.
These solutions work well for gutter issues and most of them can be carried out right at home without issues.
Age Leaks
Having an old roof is inevitable. All roofs age with time no matter the material used to make them. Exposure to the elements such as the sun, wind, the cold and just about anything in the outside environment eventually takes a toll on the roof.
For this type of issue, the solution is a roof replacement. Each roof replacement procedure will differ depending on the material used, the design of the house, the roof design and many other aspects. This type of solution can only be carried out by an expert roofer and not as a DIY project at home.
Roof Valley Leaks
Most leaks occur in roof valleys given the complexity of the roof structure in these valleys. Roof valleys are the regions of the roof where two or more planes meet on the lower side. The upper sides are the apex of the roof. In the valleys, a lot of careful sealing and sturdy construction is needed to prevent water from seeping into the roofing materials below.
Roof valleys can lead to leaks either due to poor sealing or the architecture of the roof itself being faulty. Given that roof valleys have the highest amounts of water on the roof due to the coming together of the various planes, a seemingly well-constructed valley can leak as well.
The options for this kind of leak include the following:
Resealing the Valley
For this option, the roof is resealed afresh to do away with any holes or spaces that water may be exploiting to enter the house. Use the sealant recommended for your area for the best results.
Repairs
For the repairs option, you should enlist the services of an expert as roof valleys are quite complicated and taking them apart for repairs can only lead to issues for the inexperienced person.
Reconstruction
This option is chosen when the problem can’t be solved with simple resealing or repairs. As such, that section of the roof will be reconstructed by an expert at roofing with the focus being putting in place a roof valley that doesn’t leak.
To prevent roof valley leaks, always choose a quality roofer for your house. This is because a lot of constructers find this section of the roof quite difficult. Better yet, go for a simpler roof design to avoid deep and unnecessary valleys.
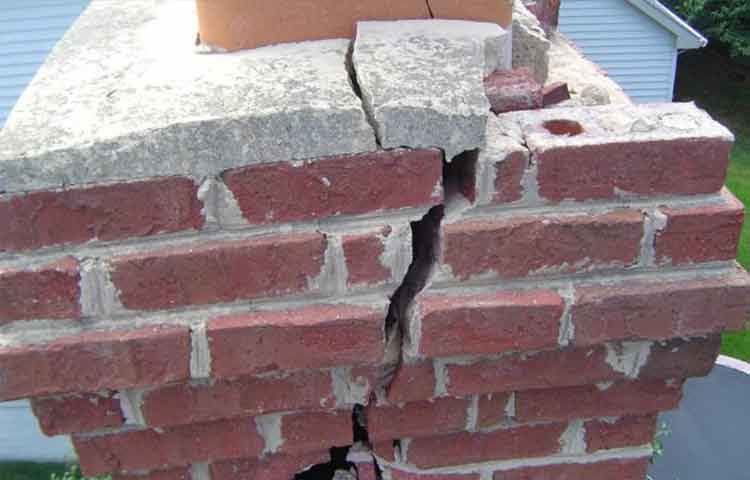
Chimney Leaks
A chimney will often present various challenges in its structure which, if not done properly, can be challenging. Leaks can occur through the mud cap, the joint where the chimney joins with the rest of the roof, and the shingles next to the chimney.
These areas often leak due to the wearing out of the materials used to make the chimney. Cement, sand and mortar wear out faster than other roofing materials such as shingles and metal when exposed to the elements the way chimneys are.
The fixing process for these issues on the chimney is as follows:
- For the mud cap that’s worn out, you will need to either build a new mud cap or, if the wearing out is minimal, restore the current mud cap.
- The complex problem is that of the joint where the chimney joins the rest of the roof. For this issue, proper roof sealant should be used to ensure a watertight seal between the chimney and the roof.
- If the shingles closest to the chimney are loose or broken, you’ll need to refit them afresh complete with a sealant. This procedure is dealt with below.
In most cases, you’ll need the input of an expert to fix chimney issues. This is because it entails mixing mortar and the person who did the chimney knows exactly what materials were used in constructing it.
Condensation Leaks
When condensation occurs in the attic due to the temperature difference between the indoors and outdoors, water forms on the roof and appears as a normal leak. The reason behind this leak is the lack of proper ventilation in the attic. Instead of allowing the moisture to escape outdoors, the malfunctioning ventilation will trap the moisture indoors.
The procedure is as follows:
- First, you unblock any blocked moisture vents in the roof. These may be blocked by snow, leaves and twigs or even rodent nests.
- After that, you treat the mold or mildew in the roof to prevent any further growth.
If, even after these measures, the attic still tends to accumulate moisture, you can install a ventilation fan in your attic. This will ensure that the air in the attic is circulated frequently enough to prevent any condensation from occurring. The fan will only work well if there are enough ventilation holes in the attic.
Flashing Leaks
The small pieces of metal placed under the shingles to provide a watertight seal are the flashing of the roof. While they’re visible as metal strips in the roofs where they’re exposed, they appear as a rubber coating when concealed. At times, flashing develops cracks due to wear and tear or damage and lets water into the roof causing leaks.
This issue is fixed as follows:
- Pry up the nails holding the affected shingles and remove them together with their shingles.
- Remove the old flashing with a putty knife then apply new flashing.
- Put the shingles in place then secure them with roofing nails.
- Cover the flashing with sealant when done.
The reason we advocate for sealing the flashing is that exposed flashing is more vulnerable to cracking than the concealed type.
Roll Roofing Leaks
Unlike the use of shingles or tiles, roll roofing entails the use of rolled up sheets of rubber or asphalt. The sheets are then unrolled and glued to a wooden substrate. Roll roofing can develop various issues such as blisters and splits due to damage by water or other elements. These are solved as follows:
- For splits of less than 0.64 inches (¼ inch), simply use a roof sealant for the leak.
- For larger splits, use patches for the type of material the rolls are made of. Ensure that you add plastic roof cement under the split for a lasting fix.
- For blisters, cut them open to release the air and water contained in them. Ensure that you don’t cut the substrate underneath the roll. Patch them up afterwards.
- If the leak caused the wooden substrate to rot, cut out that part then replace it with a new tightly-fitting piece of wood.
- If the area repaired is large, apply a fresh sheet of roll on it then seal it properly.
For the more complex tasks such as replacing the roof substrate, call for an expert.
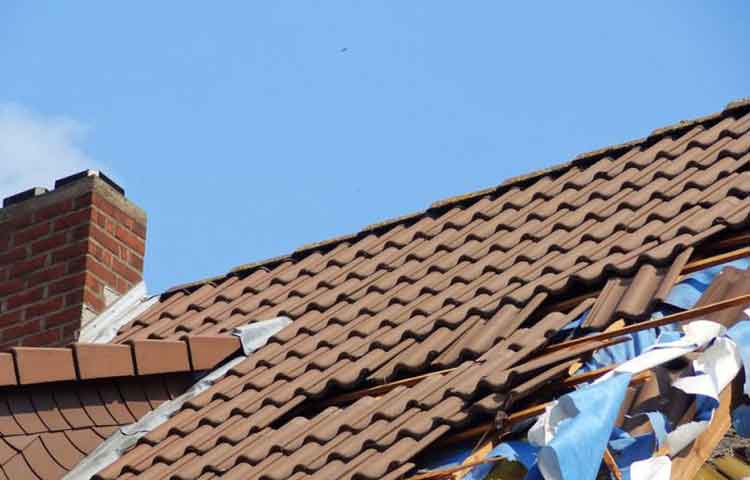
Shingle Leaks Repair
Your roof shingles can break due to various aspects among them high winds, heavy rains, being stepped on, the weight of snow, or simply wearing out. The shingle can either be broken or missing in its entirety as the process of fixing this type of leak is the same. Before commencing, you’ll need a new shingle(s) of the same type as the missing one. If, however, the shingle in question is only slightly torn and is made of reparable material, simply use shingle glue to patch it up.
The steps are as follows:
- Pry up the nails of the shingle below the broken one using a hammer or a pry tool.
- Insert the new shingle below the one above it.
- Use roofing nails to secure it in place.
- If there was flashing on the previous shingle, use flashing around the shingle.
If it’s a group of missing shingles, the procedure is the same. In our experience, starting the renovation from the side with shingles in good condition is easier as they guide you on where to place each new shingle.
These fixes are only possible if you know exactly what is causing the leak in the first place. Again, we urge you to enlist the services of an expert if at all you’ll run into something you don’t know how to fix. This way, you’re guaranteed that the issue will be handled properly. As it shall be seen in the following section, hiring an expert to do it isn’t that expensive especially for the common problems.
How much does it Cost to Repair Fix Roof Leaks?
The estimated costs of fixing roof leaks depend on the issues in question. Among the most common fixes and their prices for an average single-story house are as follows:
- Installing roof shingles $7,500
- Installing metal roof $14,500
- Installing flat roof $8,225
- Repairing a skylight $767
- Removing snow on roof $300
- Repairing roof venting $500
- Repairing roof gutters $20 per linear foot
- Fixing a roof chimney $250
As seen here, the cost of getting your roof repaired of leaks isn’t too much. We thus advise getting a professional to deal with your roofing issues since the work will be much better than if you did it yourself.
Further Reading